Help Center
Documentation
1. Introduction
XRSF enables seamless creation and intelligent processing of invoices directly within Salesforce. The tool supports the generation of XML-based e-invoices and automates the mapping of incoming invoice data to Salesforce records, saving time and ensuring consistency across your data model.
This documentation provides detailed information about the tool and outlines all necessary steps for the successful installation and configuration of XRSF.
Do you have any other questions or need help getting started? Just send us an email at support@xrsf.de and we’ll be happy to assist you.
Note: Support related to document creation and templating is subject to additional charges.
1.1. Features
XRSF offers the following functionalities directly within your Salesforce environment:
- Efficient creation of XML-based e-invoices and automated processing of incoming e-invoice files, all within Salesforce.
- Automated data mapping from invoice content to Salesforce records, reducing manual effort and improving accuracy.
- Minimization of input errors through consistent and reliable data transfer.
All functionalities can be fully automated using native Salesforce tools. XRSF integrates seamlessly with Flows, Apex, and other platform capabilities to support end-to-end processes.
This list serves as an overview. Each of these features will be described in detail in the following chapters.
1.2. Interface of XRSF
| Tab | Description |
|---|---|
| Home | General overview of the app's usage and performance, acting as your dashboard |
| Configurations | Manage the main settings and business rules through a configuration record, which is created during setup. |
| Standards | Define the structure and data model used in your invoice files. |
| Templates | Define how each XML and PDF element is populated using Salesforce data, static values or nested configurations. |
| Mappings | This is where you create and manage your mappings. |
| Jobs | View all jobs that have been created through the application. |
| Results | List of most of the actions performed in the applicatoin with the respective result and information about and errors that may have occurred. |
This overview is intended to make the rest of the documentation easier to follow. Each section will be described in more detail later.
1.3. Requirements
XRSF is designed exclusively for use in Salesforce. It is compatible with the following Salesforce editions: Platform, Sales Cloud, Enterprise, Unlimited.
There are restrictions with the Salesforce Professional Edition. Here you can only use XRSF if you order API callouts from Salesforce.
2. Installation and Configuration
To use XRSF, a few preparatory steps are necessary. These include, of course, installing the tool itself, but also further configurative measures, which we describe in this chapter.
Hinweis: Bei dem Erwerb von XRSF bieten wir einen kostenlosen Einrichtungsservice an! Schreibe uns einfach eine Email an support@xrsf.de.
2.1. Installation
XRSF is installed via Salesforce AppExchange.
Click the ‘Get It Now’ button to start the installation process.
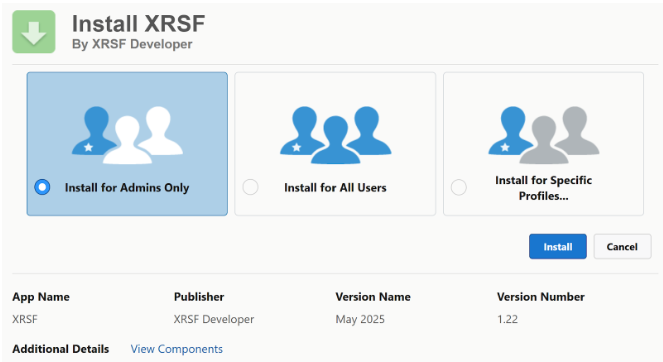
When you get to the installation page, select "For Administrators Only". This selection is necessary because otherwise unauthorised users could also gain access to sensitive data.
 X
X
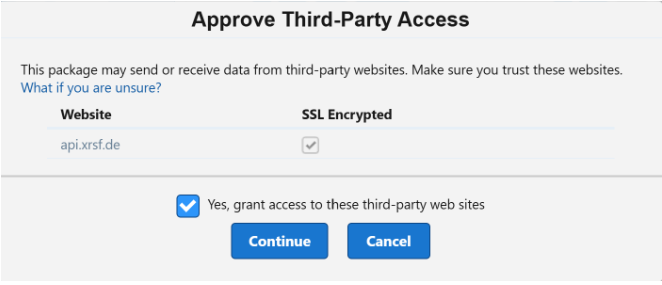
Click on ‘Install’ and confirm the message "Yes, grant access to these third-party web sites".
Background: As part of the installation, permission must be granted to access various interfaces. In addition to the interface, communication with the XRSF servers must also be established for the tool to work smoothly.
 X
X
 X
X
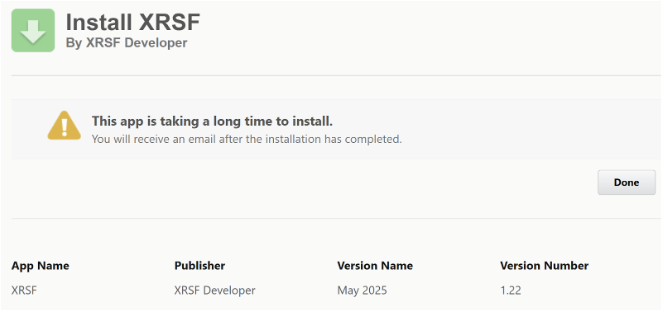
You may see a notification that says "This application is taking a while to install. You'll get an email when it's done." If you see this notification for the first time, don't worry. Just click Done. Salesforce will email you when the installation is complete.
 X
X
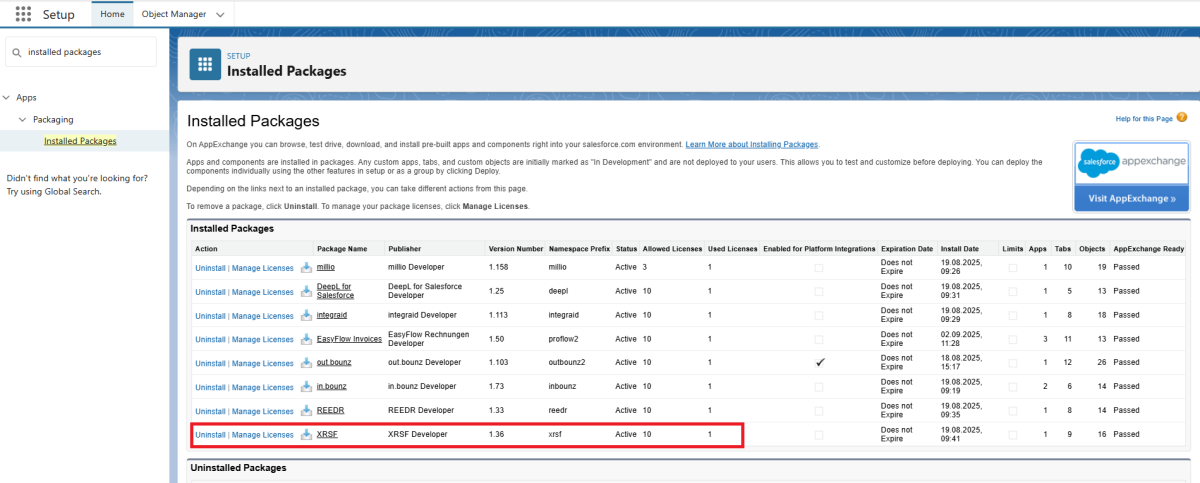
After installation is complete, we recommend checking the installation in the ‘Packages’ section under "Installed Packages" in the Salesforce Setup.
 X
X
2.2. Granting rights of use
The use of the application does not require any special rights for Salesforce users. Authorisations to view the XRSF data records only need to be assigned for configuration and debugging. A basic distinction is made between two types of authorisations:
- XRSF licences*
- Salesforce Permission Sets*
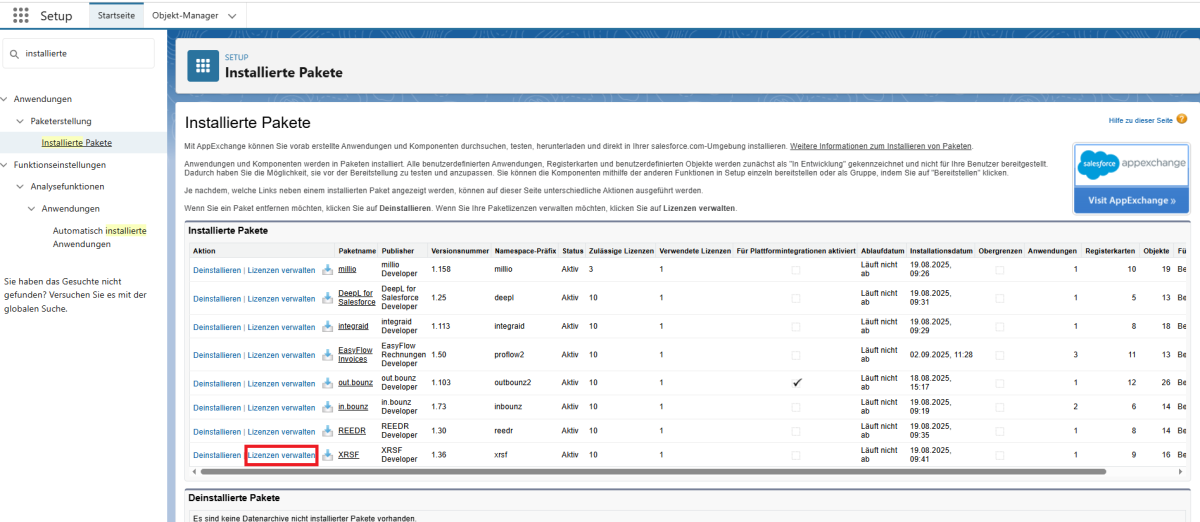
XRSF licences are assigned directly to the XRSF package listed there in the ‘Installed packages’ area. To do this, click on the ‘Manage licences’ button and assign the desired users.
 X
X
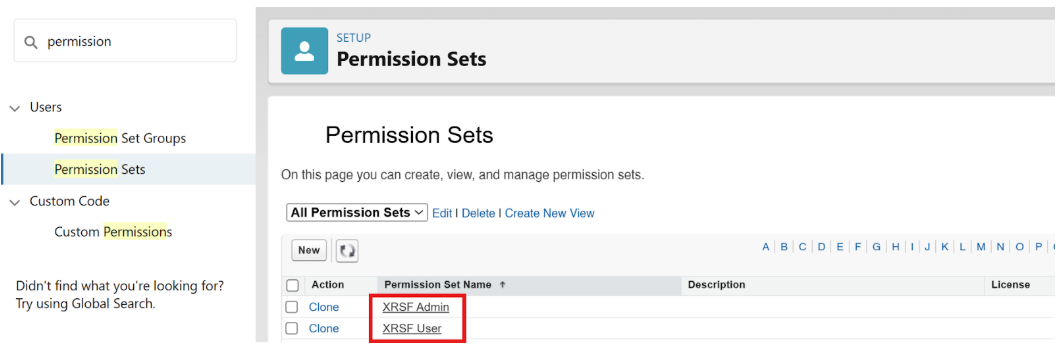
Salesforce permission sets, on the other hand, are assigned separately. In general, XRSF distinguishes between the following types of Salesforce permission sets:
- XRSF Admin: for full administrative access to all areas of the application.
- XRSF User: for user access.
To assign these permission sets, search for "Permission sets" in Setup.
Find ‘XRSF Admin’ and ‘XRSF User’ in the list and click on the respective permission set you want to assign to a user.
 X
X
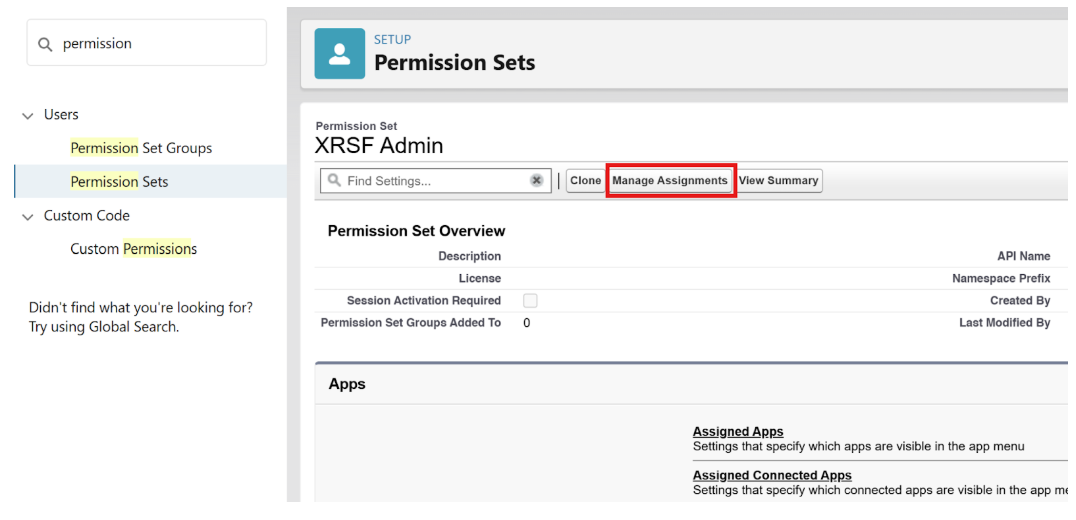
Go to "Manage assignments" and add the desired users by ticking the checkbox.
 X
X
IMPORTANT: It is also essential to release the dashboards and reports that come standard with XRSF. To do this, please switch to the standard tabs for ‘Reports’ and ‘Dashboards’ in the Salesforce interface and then (!) release the folder ‘XRSF’ (which was added when XRSF was installed) for the group of all internal users in the release settings of that folder.This sharing option can be found as follows: Search for Reports or Dashboards > All Folders > XRSF > Share (using the arrow function on the right). If this step is missed, the XRSF app home screen may not display correctly for users without an administrator licence.
2.3. Record Page Activation
Since Salesforce unfortunately does not allow the activation of record pages when using record types at the same time when installing applications like XRSF, this must be done manually once after installation. Activation is essential to be able to use all of XRSF's features.
Specifically, this concerns the ‘Template’, ‘Scope’, and ‘Record Rule’ objects.
You can find this in the setup. Enter ‘Lightning App Builder’ or ‘Lightning Application Builder’ in the search bar.
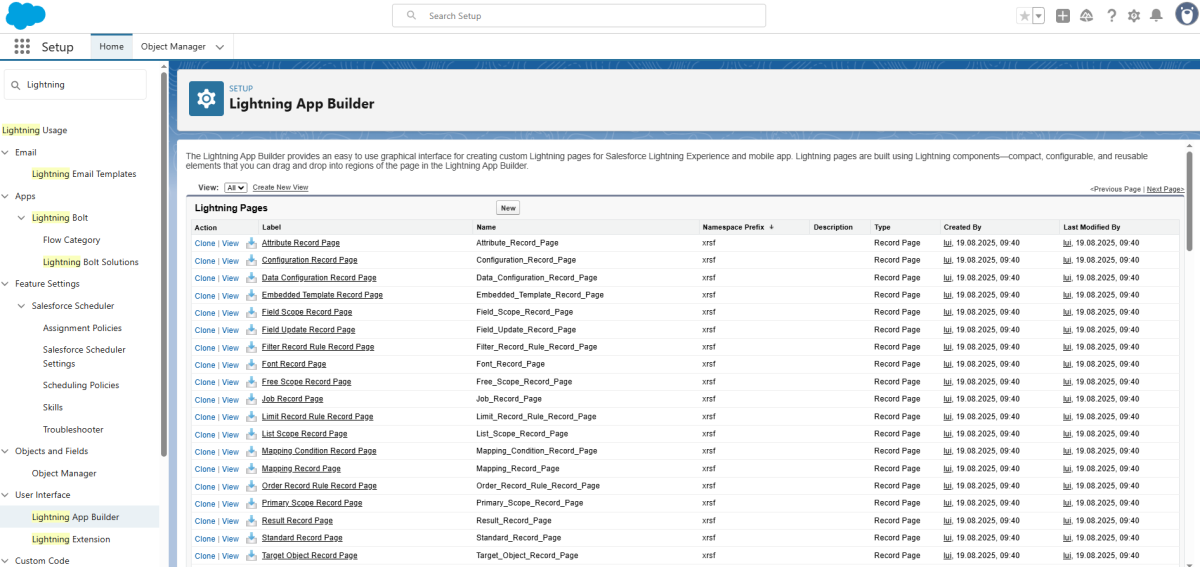 X
X
You can assign the respective objects in detail as follows:
Click on page > Show > Activation > Assign to applications, record type and profiles > Select all apps that are used > Next > Desktop and phone > Next > Select the respective Record Type > Next > Select all profiles > Save.
Activate the following record pages:
| Object | Page | Record Type |
|---|---|---|
| Template | Embedded Template Record Page | Embedded |
| Template | XML Template Record Page | XML |
| Record Rule | Filter Record Rule Record Page | Filter |
| Record Rule | Limit Record Rule Record Page | Limit |
| Record Rule | Order Record Rule Record Page | Order |
| Scope | Field Scope Record Page | Field |
| Scope | List Scope Record Page | List |
| Scope | Free Scope Record Page | Free |
| Scope | Primary Scope Record Page | Primary |
2.4. Configuration
Search for the ‘XRSF’ app in the App Launcher* using the search function.
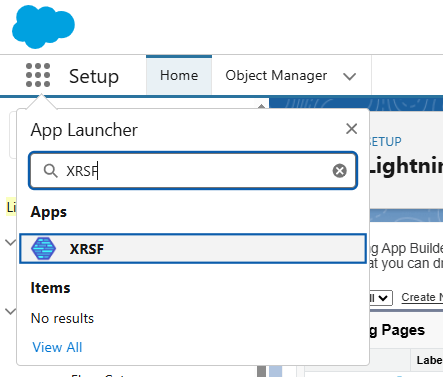 X
X
Switch directly to the ‘Configurations’ tab in the app. You will already find a configuration data set here. In this data set, you have to fill in fields with the necessary information to configure XRSF.
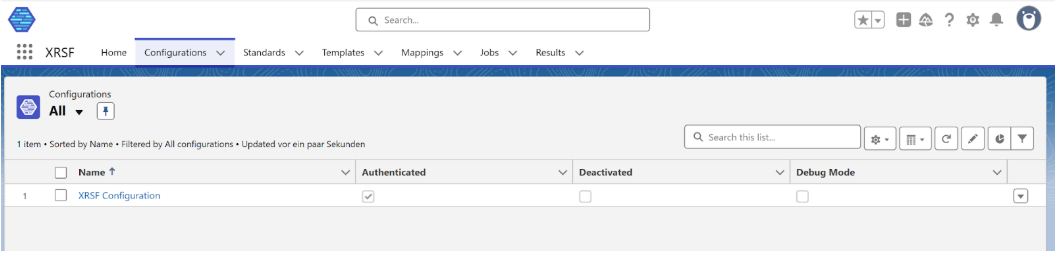 X
X
The following fields can be configured:
| Field | Mandatory | Description |
|---|---|---|
| Authenticated | Mandatory | Shows whether XRSF is authenticated with Salesforce. |
| Error Email Address | Optional | In this field you can specify an email address to which notificatoins are sent in the event of an error. |
| Deactivated | Optional | Should not be ticked by default. This setting can be used to disable XRSF completely. |
| Debug Mode | Optional | This setting is used for advanced playout of communication details between Salesforce and the XRSF interface. |
2.5. Trial version
You have the option to test XRSF for 30 days free of charge and to process 32 incoming and 32 outgoing documents. You do not have to provide any account information to do so. After 30 days, the test phase will automatically expire and you will no longer be able to access XRSF.
If you want to test XRSF in a sandbox, the installation process works exactly the same as in the live environment. The only exception to this is when the sandbox is a partial copy in which the configuration record has been transferred. In this case, it is essential to use the ‘Reset Configuration’ button in the configuration record to ensure a smooth process.
2.6. Order licenses
After you have set up the configuration record, you still need to complete the purchase process.
This step is essential to using XRSF!
The licence fees for using XRSF are collected by direct debit from the account you specify. This is how you can enter your corresponding information:
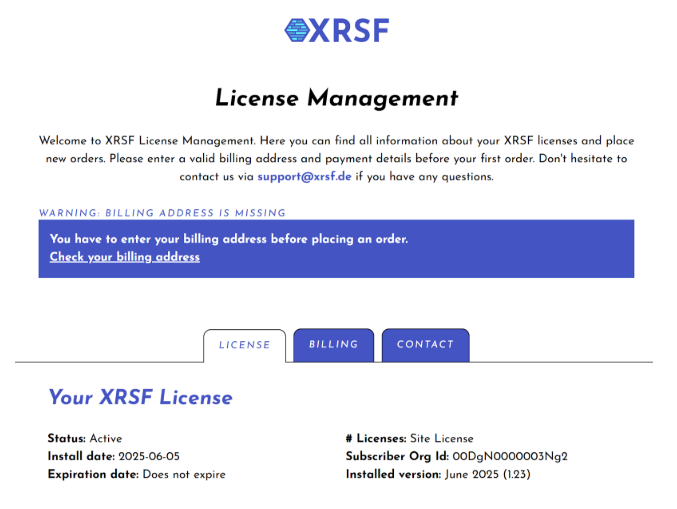
In the XRSF app, you will find the ‘Manage Licenses’ button at the configuration record level. Clicking on the button opens a login page to your license management area. In this customer portal, you will find all important data about your XRSF licenses, payment information, but also the option to purchase additional licenses with a single click.
To log in, you will receive an individual code by email, which you enter in the login screen. After logging in, the overview page will open with some instructions on what information you need to provide us with in order to use XRSF in the future.
By clicking on ‘Check your billing address,’ you can enter a valid billing address. Then click on ‘Check your SEPA direct debit mandate’ to set up a valid SEPA direct debit mandate. You can also find the input masks for your data in the tabs ‘Billing’ and ‘Payment’ below.
After you have entered and saved the necessary data, you will receive a confirmation email from us along with a document containing all the information about your SEPA direct debit mandate.
Note: The confirmation email will be sent to the email address provided when downloading XRSF from the Salesforce AppExchange! If this email is not available, simply write us a message at support@xrsf.de
 X
X
2.7. Authentication
nce the configuration record is created, you will need to authenticate with the XRSF servers to use all available features.
This authentication is a one-time process. To authenticate, simply click the ‘Authenticate’ button in the created record.
After successful authentication (which may need to be completed by confirming the OAuth2 query), the user is redirected to a results page. If authentication is successful, this is indicated by a check mark in the ‘Authenticated’ field.
In the event of successful authentication, the following message also appears:
 X
X
The tick under ‘Authenticated’ is then also set in the configuration data set.
Note: For advanced security, we strongly recommend enabling Login IP Ranges for the integration user's profile (the user who is authenticating). This restricts access to this user from our server only. The IP address ranges to be defined are:
- IP Start & End Address: 92.205.105.248
- IP Start & End Address: 2a00:1169:11d:7b40::
3. Operational use of XRSF
In this chapter, we describe how you can get the most out of XRSF.
We'll show you the settings using use cases to make the configuration clearer. Of course, you can configure and use XRSF for your own individual use case and with your own custom objects.
3.1. Standards
The Standards tab allows you to define the structure and content model for your invoice files.
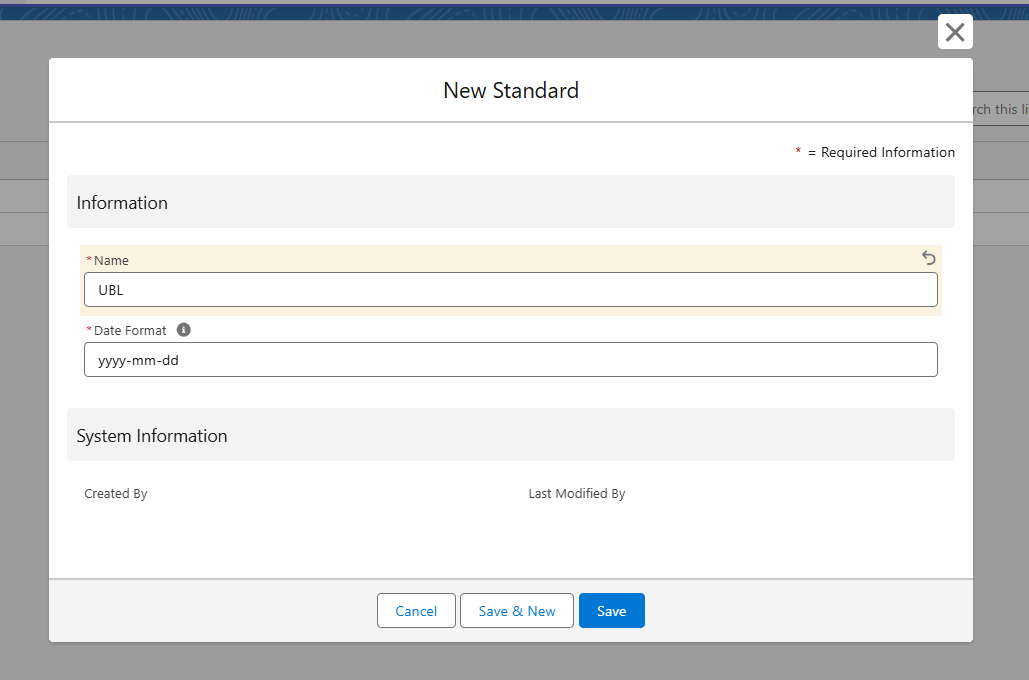
To create a new standard, simply navigate to the ‘Standards’ tab and click on the ‘New’ button.
 X
X
Here you can define a name and date format for your standard. The date format determines how date fields will appear in the final XML document. You can use any combination of yyyy, mm, and dd. For example, yyyy-mm-dd is the correct format for UBL invoices, while CII invoices use yyyymmdd.
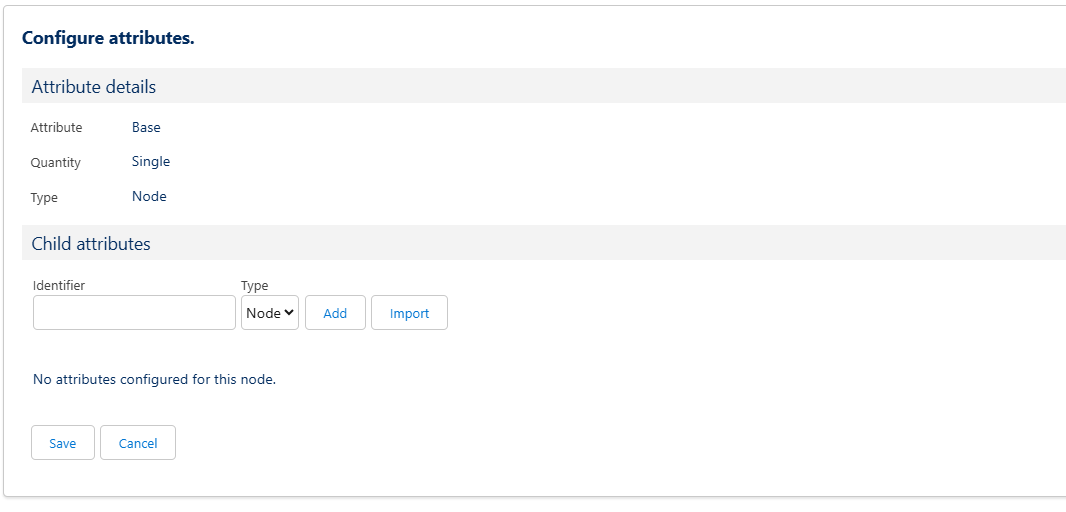
Clicking on the 'Configure' button at the top right allows you to manually build the document structure by defining attributes. Attributes can be of type 'Node' or 'Value'. A Node acts as a container in the XML and can include other nodes or values. A Value stores the actual data, such as the invoice number, sender information, totals, and so on.
 X
X
If you already have a XML document with your desired structure, or you want your invoice to follow certain guidelines (like XRechnung, ZugFerd, etc. ) you can use the 'Import' button to let XRSF adapt the structure of your XML document automatically.
You can, of course, also model the structure of your XML by hand. To add an attribute, enter the identifier of the attribute, choose your type (Node, Value) and click on the 'Add' button. Once you have defined all desired attributes, click 'Save' to save any changes.
Note: For certain guidelines regarding the invoice structure there are syntactical rules as well as mandatory attributes that must be included into the configuration. We strongly recommend using the import feature to eliminate syntactical errors.
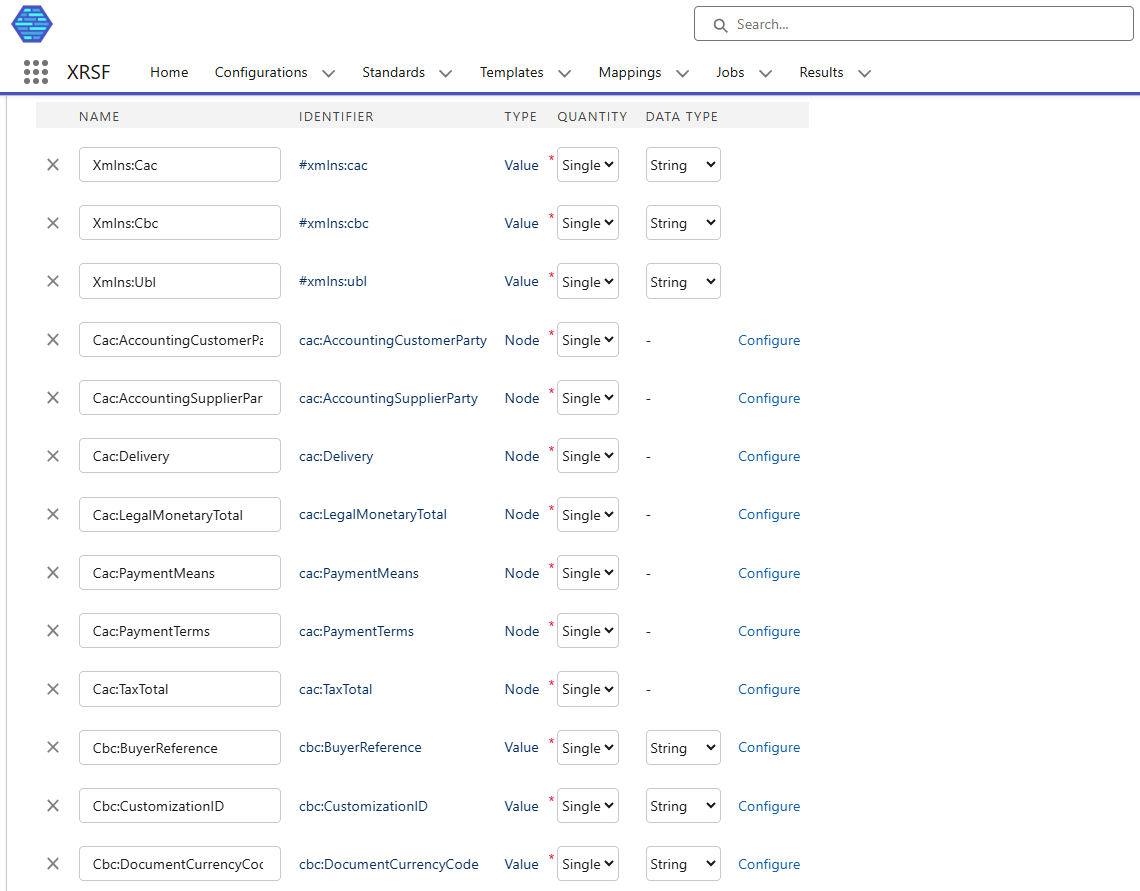
In the following example, we want to configure a standard that should be used for an invoice of the format "XRechnung" using UBL syntax. For this purpose, we use the 'Import' button and upload an exemplary XML file of an "XRechnung". The automatically configured attributes will then look something like this:
 X
X
Note: When using the import functionality, some variables may not be assigned the correct data type automatically. We recommend to manually check the data type of each variable once after the import.
3.2. Templates
Once your Standard is set up, you can continue to the Templates tab. Templates define how your invoices will be created and are essential when generating e-invoices.
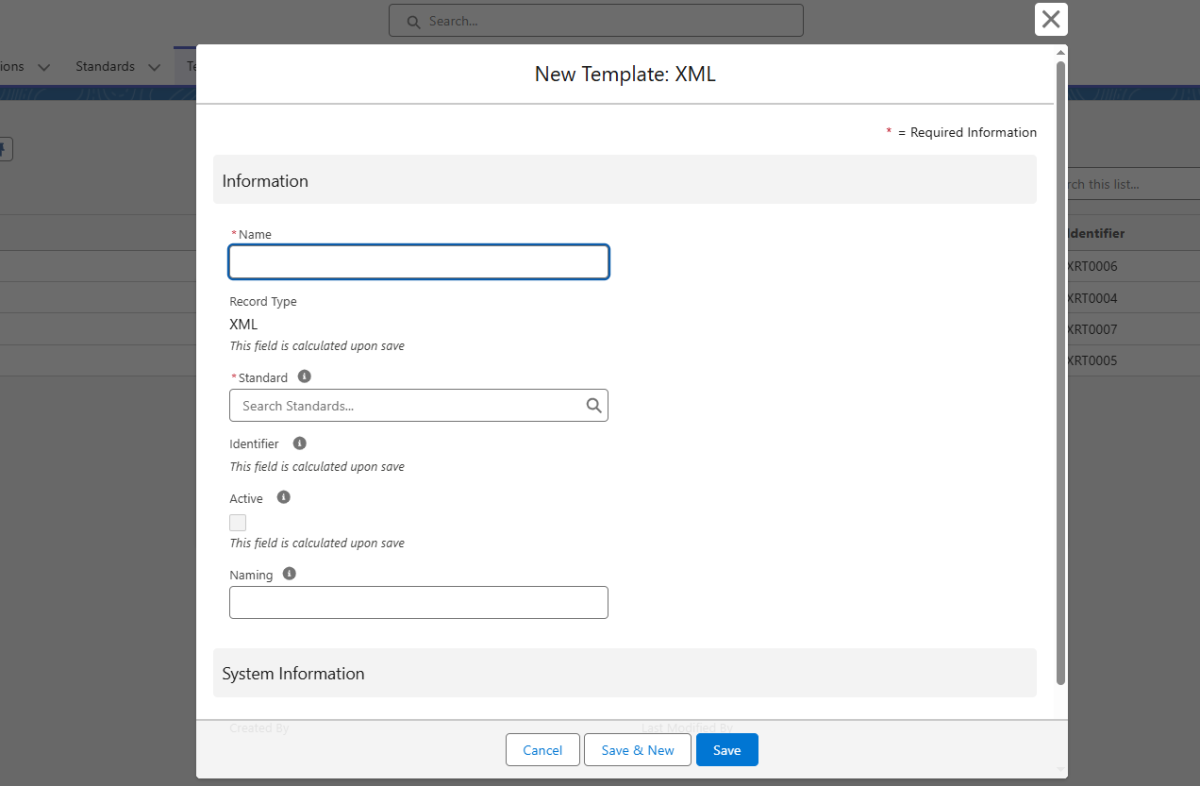
To create a new template, click on 'New' in the Template section. XRSF will now ask you for the type of the template you want to create. If you want to generate a standalone XML file, choose the 'XML' type. If the XML should be embedded into a PDF (as for ZugFerD invoices), select the 'Embedded' type.
 X
X
In the 'New Template' window, you can now configure the following fields:
| Field | Mandatory | Description |
|---|---|---|
| Name | Mandatory | Here you can enter a name for the template. |
| Standard | Mandatory | Here you can define the standard this template should use. |
| Naming | Optional | Here you can specify a naming pattern that should be used for the invoice creation. You can also use Merge Fields for this naming pattern. |
| Embedded Naming (only for Embedded) | Optional | Here you can specify a naming pattern that should be used for the PDF creation specifically. You can also use Merge Fields for this naming pattern. |
| XMP Requirement (only for Embedded) | Optional | Here you can define XMP metadata that should be used for embedding data into your PDF file. We will go more into detail about XMP metadata later on. |
After you have filled out the fields, click on 'Save' and you will be directed to the newly created template. Here you can now further define configurations.
3.2.1. Scopes
Scopes define the context of the data used within a template. For example, if the scope is set to Invoice, the template can access all fields available on the Invoice object.
Scopes determine which records are considered when generating a document. Each template must have at least one Primary Scope, which refers to the Salesforce ID of the primary source record.
Every template scope is linked to a specific template record, and defines which data is available within that template. Scopes reflect the data model of the connected Salesforce org and serve several purposes.
To create the primary scope, click on the "New" button in the scopes section and select 'Primary'.
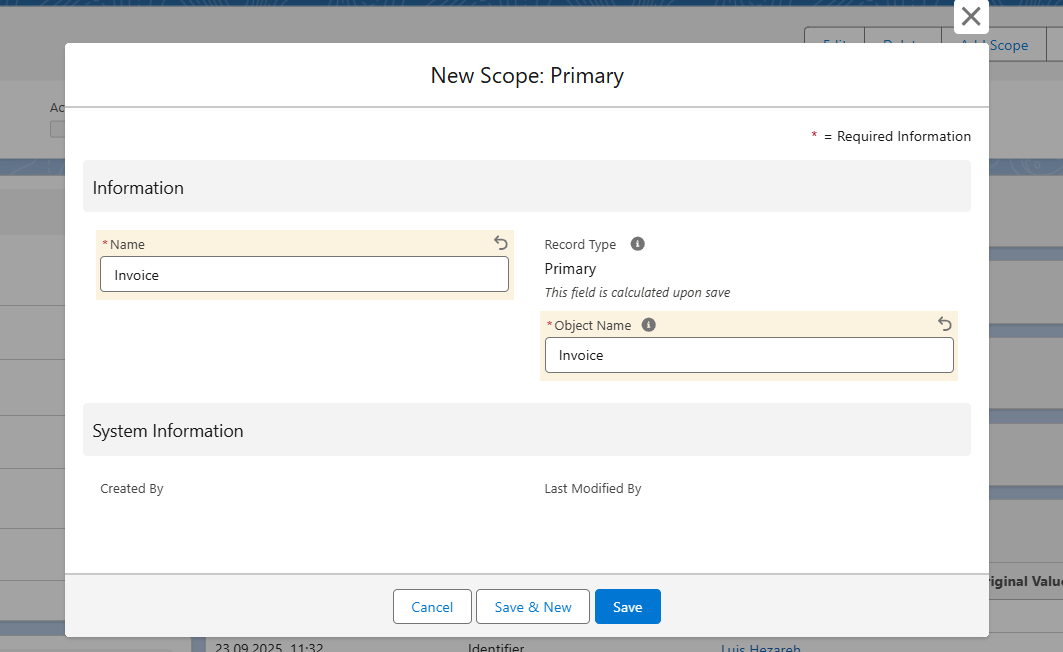 X
X
In addition to the primary scope, you can create field scopes and list scopes within the primary scope by clicking on the 'Create Child Scope' button. These types of scopes are known as children of the primary scope, meaning that they refer to data within the object of the primary scope. You can also create a free scope by clicking on the 'New' button in the scope data record.
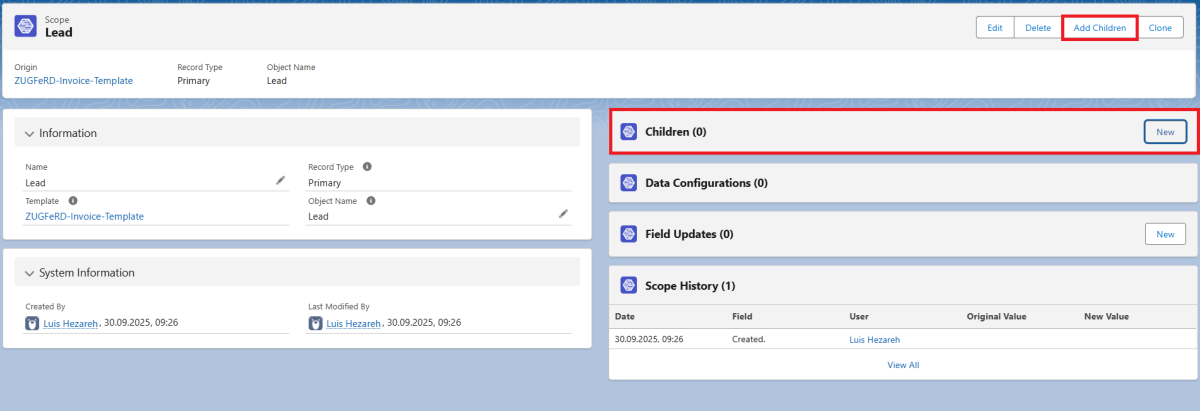 X
X
- Field scopes refer to lookup fields of the object and the data of the objects to which the lookup points (e.g. an account).
- List scopes refer to data from the object's lists (e.g. all contacts under the account defined in the field scope).
- Free scopes refer to all data records in Salesforce and do not need to be linked to a field or list scope (e.g. all products in Salesforce).
For Field and List scopes, you must define a parent record (e.g. your primary scope). Free Scopes do not need a parent record.
Record Rules
In the case of list and free scopes, you can define 'Record Rules' to exactly filter the entries of the scope you want to include.
There are three types of record rules:
- Filter Record Rule
- Limit Record Rule
- Order Record Rule
Filter Record Rules
This type of record rule is used to filter records from the scope based on the evaluation of a condition on a certain field. The 'Field Name' and 'Value' are compared using the selected 'Operator', and only the records for which the condition evaluates to true will be considered for the scope.
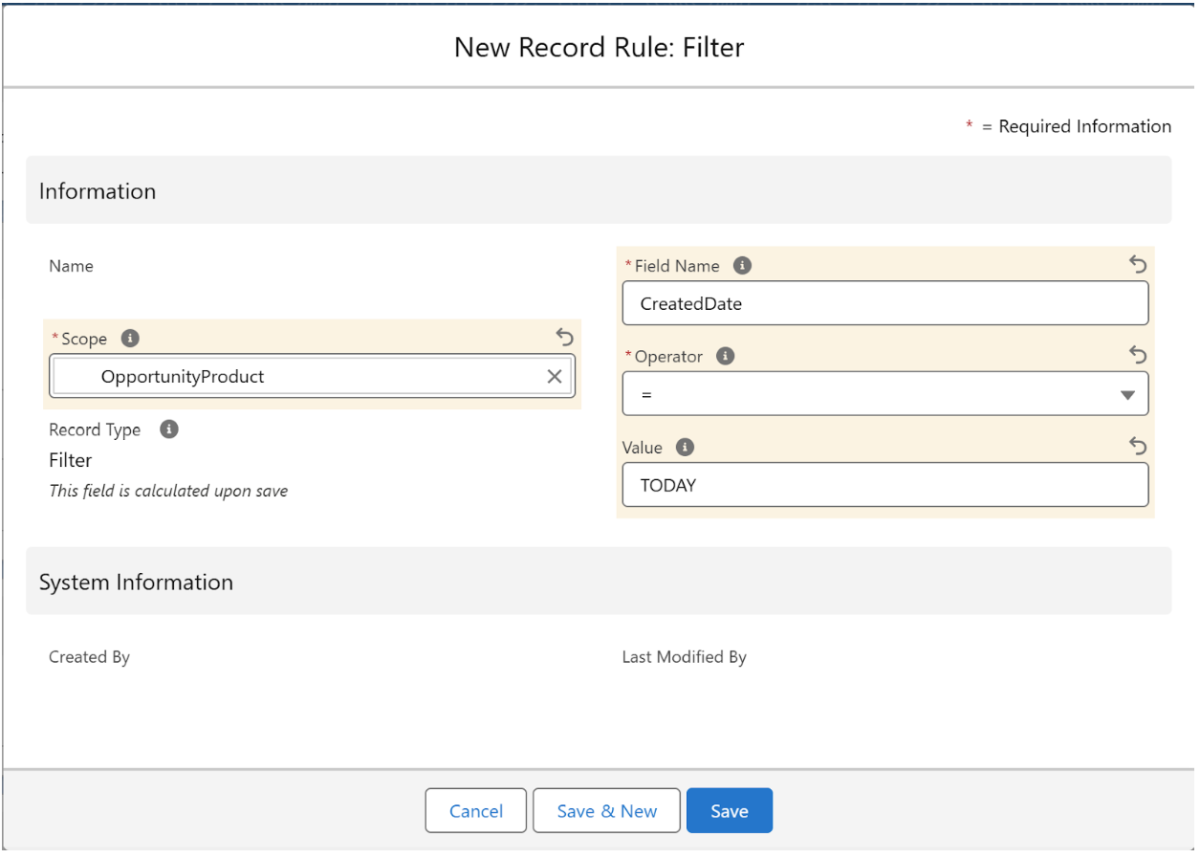 X
X
Limit Record Rules
With a limit record rule, you can specify how many records should be included. Simply create a limit record rule and enter the amount of records included in the 'Value' field.
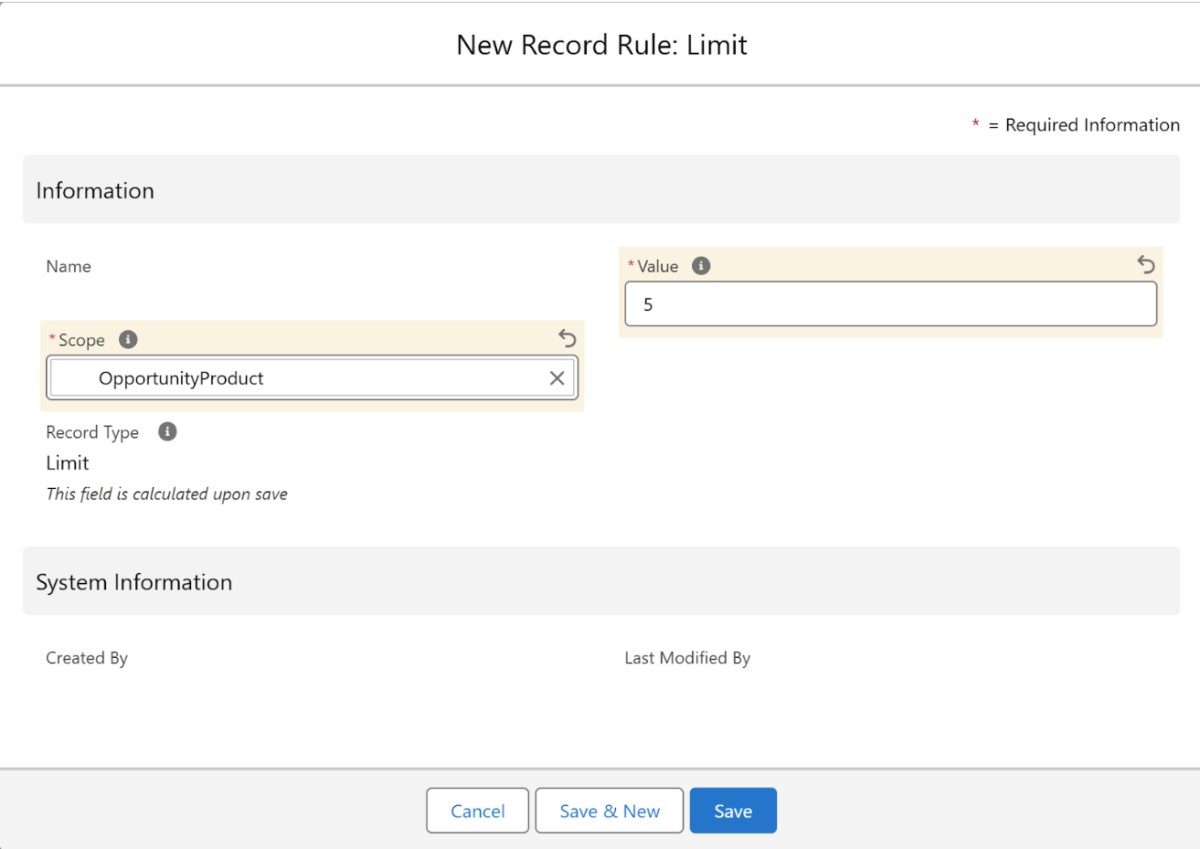 X
X
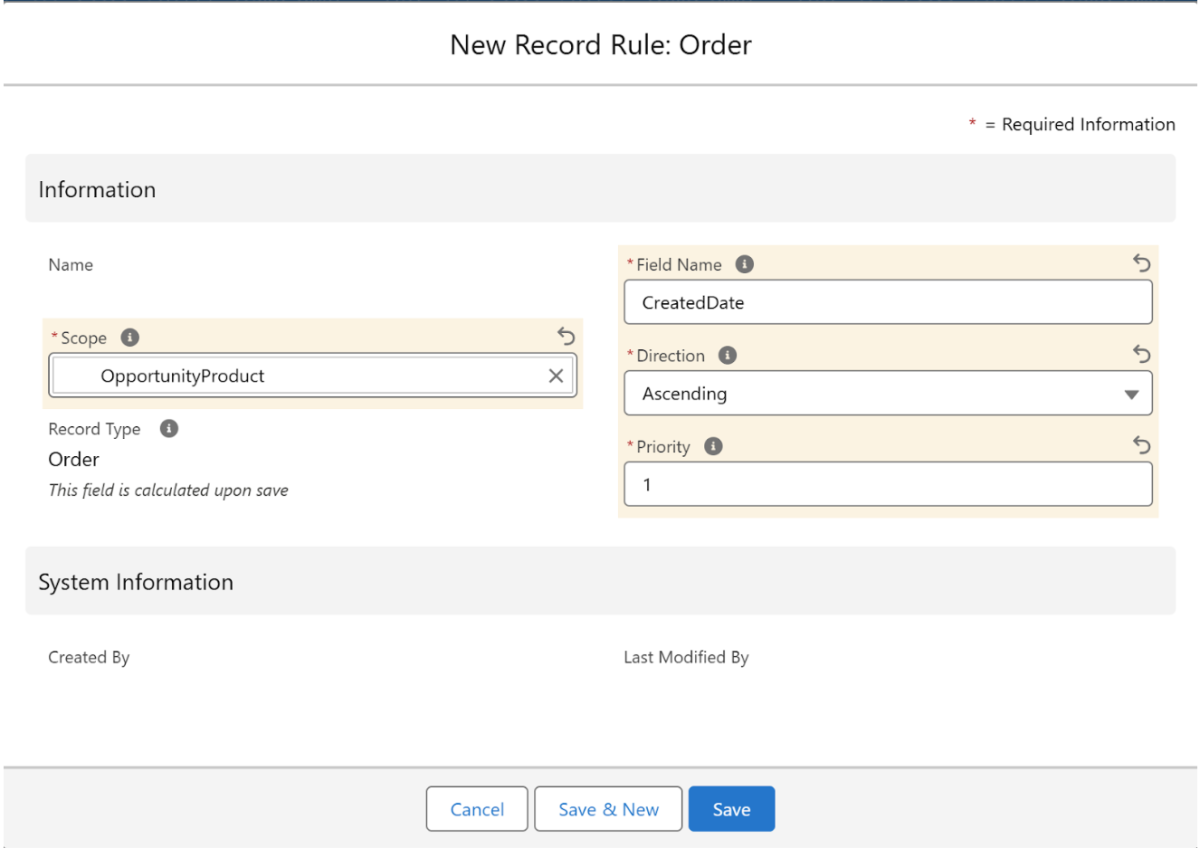
Order Record Rule
With order record rules you can define wether records should be sorted in a specific order based on a specific field of the scope object. XRSF lets you define multiple order record rules, which can be ordered themselves using the 'Priority' field.
 X
X
3.2.2. Data Configurations
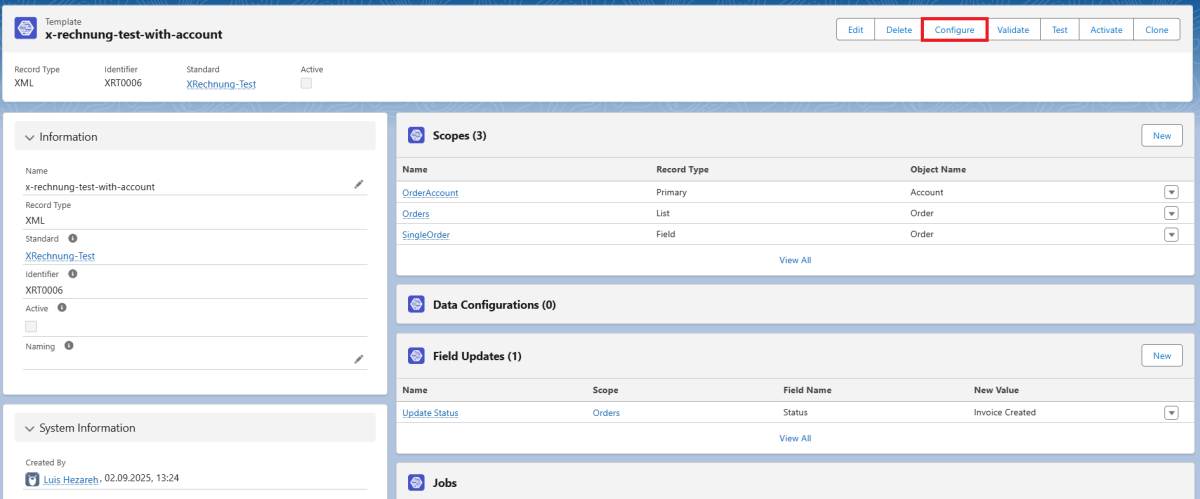
With Data Configurations, you can populate the attributes of your invoice with data from your Salesforce Organization, specifically from your scopes. You can create a data configuration via the 'Configure' button at the top right.
 X
X
After clicking 'Configure', a new window opens where you now can specify configurations.
 X
X
Here you can now add child configurations via the 'Add' button. You can specify the attribute that should be populated and the scope from where the data originates.
The data configurations follow the same structure as you have defined in the corresponding standard. With nested arguments, search for the values via the configure button of each attribute.
 X
X
If you leave the scope empty, you can use data from all of your defined scopes via merge fields, specify static input or choose pre-defined variables (e.g. current date, current user ID).
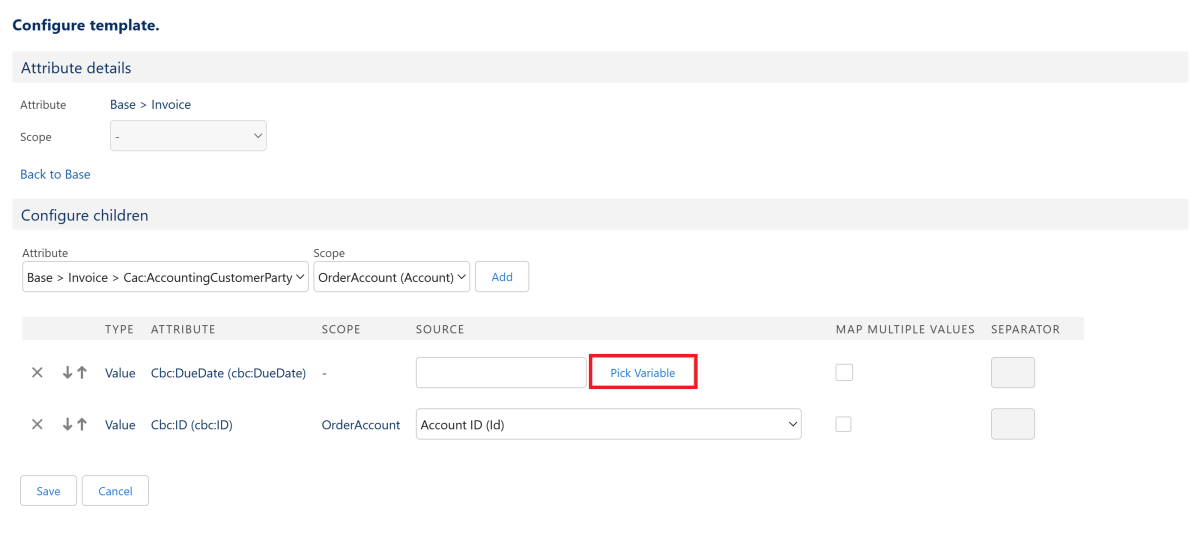 X
X
In this example, we populate the "ID" attribute with the value of the "Account ID" field from the "OrderAccount" Scope. In addition, we do not want to use data from a scope for the "DueDate" attribute, so we left the scope field empty and can now choose a value from the picklist under "Pick Variable".
Once you have specified all data configurations, click on 'Save' and you will get back to the template overview.
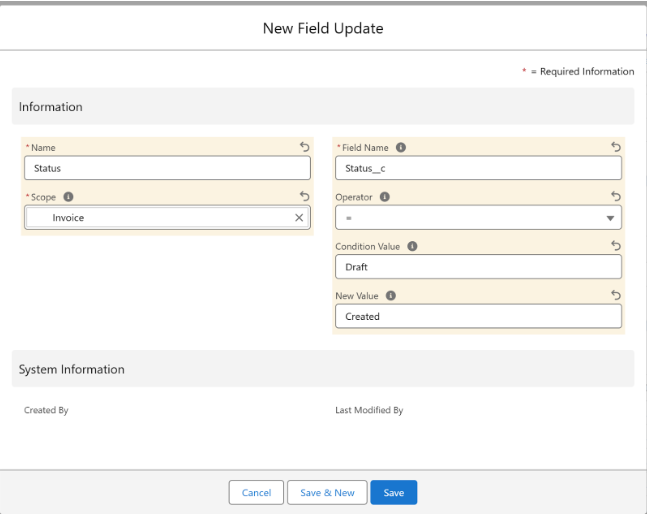
3.2.3. Field Updates
You can also configure field updates within the Template, which lets you update fields on your source record after an invoice is created, such as setting a “Send Date” to today. In field updates you can also set a condition under which the field update is applied, using the ‘Operator’, ‘Condition Value’ and New Value‘ ’fields. If the given condition is not satisfied, the field update will not be executed.
In this example we want to implement a Field Update, such that the invoice status gets updated to ‘Created’ when the file is created and only if the status was formerly ‘Draft’.
 X
X
3.2.4. Additional Configuration for Embedded Templates
When using embedded Templates, there are a couple of extended configurations you can specify. These only apply to the PDF document that will be created and thus have no influence on XML Templates.
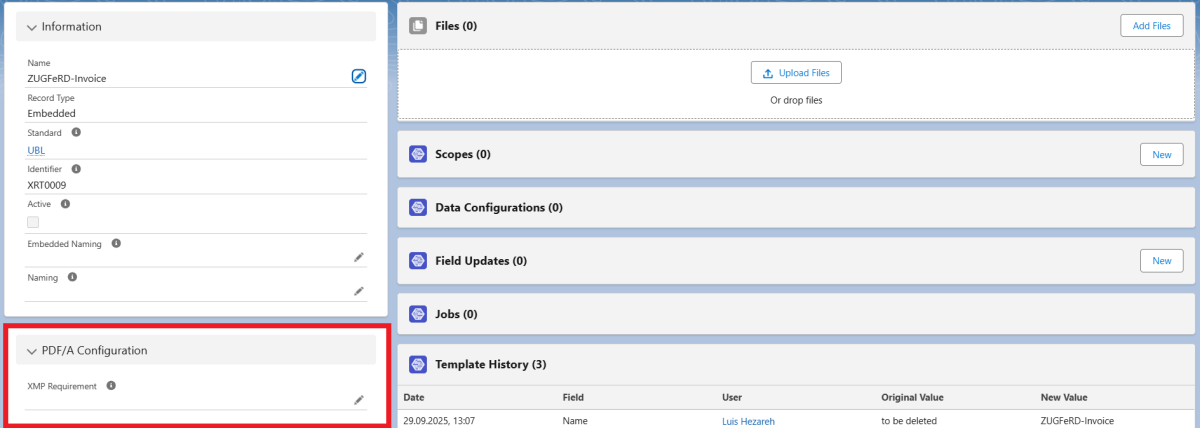
XMP Requirements
One key field for embedded Templates is XMP Metadata. This field is crucial for ensuring that your generated PDF complies with PDF/A-3B and Factur-X/ZUGFeRD standards. XMP (Extensible Metadata Platform) is a standardized XML format for embedding metadata in PDF files. This metadata provides information about the document’s structure, origin, and compliance level, and is used by consumers and validation tools to assess conformance.
To support different metadata configurations, there is a 'XMP Requirement' picklist where you can choose between Custom and ZUGFeRD.
If you select Custom, you can manually enter your own XMP metadata.
If you select ZUGFeRD, the metadata will be automatically set to a predefined, standard-compliant value.
You can set the XMP Requirement in the creation window of the Template, or later on in the template overview.
 X
X
The metadata block is embedded in the PDF and enables tools (e.g., KOSIT or ZUGFeRD validators) to interpret the PDF as a structured hybrid invoice, where the visual representation is linked to a machine-readable XML inside the PDF.
Important: The correctness and completeness of the XMP block are critical for interoperability and legal compliance, especially in countries (like Germany) that mandate standard formats like XRechnung or ZUGFeRD.
Document Generation
Additionally, you will need to upload a Microsoft Word Template in the Files section. This template acts as a blueprint for the document creation and will be used for every invoice that is created using this template. This is mandatory, as no document will be created without a blueprint in the files section.
For embedding data from your Salesforce Organisation into the Word document, you can use merge fields. Please note that the use of merge fields in Word documents is different to the use of merge fields in Salesforce. You can find a more detailed description of the use of merge fields in the next chapter of this documentation.
Also, you can specify a naming pattern that should be applied to the documents that will be created. Similar to the 'Naming' field, you can specify this pattern in the 'Embedded Naming' field.
3.2.5. Merge Fields
In XRSF, a distinction must be made between merge fields that are used in the document itself and those that can be used in scopes and field updates.
Merge fields in Microsoft Word
The syntax of the merge fields is based on the merge field logic of Microsoft Word (used, for example, when creating form letters).
A merge field is structured as follows:
{ MERGEFIELD ScopeName.Fieldname \* MERGEFORMAT }
with ScopeName the API name of the Scope and Fieldname the API name of the respective field. The "MERGEFIELD" is mandatory at the beginning of every mergefield, "MERGEFORMAT" however acts as a placeholder for optional formatting specifications (e.g. for dates, time, Upper- or Lowercase). Mergefields must be inserted with the keyboard shortcut CTRL + F9.
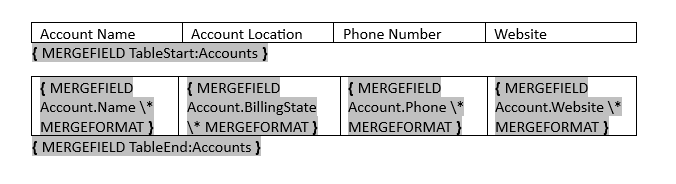
For displaying every entry of a list scope, you will need to use a slightly different syntax. The syntax is as follows:
{ MERGEFIELD TableStart:SectionName }
* Here you can input text that should be displayed for every element in the list scope *
{ MERGEFIELD TableEnd:SectionName }
with SectionName the section name of the list scope. The section name can be found in the details section of the scope record.
These TableStart/TableEnd sections make it very easy to display tables and lists in a Word document. However, list headings, as well as table headings and column names, must be defined strictly before the TableStart attribute, as otherwise they will not be displayed correctly.
In the following example, we want to create a table that displays a few fields from all records in the “Account” scope. The table configuration in Word looks as follows:
 X
X
In the document generated by XRSF, the table looks like this:
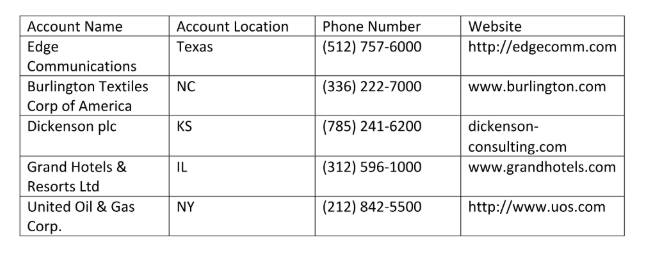 X
X
Merge fields in Salesforce
Merge fields in Salesforce can be referenced by the following syntax:
{ !ScopeName.FieldName }
Similar to merge fields in word, there is a slightly different syntax when using list scopes:
{TableStart:sectionName}
* Here you can input text that should be displayed for every element in the list scope *
{TableEnd:sectionName}
However, there is a slight difference to this syntax when using merge fields in the field updates. As field updates are always restricted to a defined scope, merge fields can be referenced just by the fieldname (instead of {!ScopeName.FieldName}, we can just use {!FieldName} ).
Condition-based Input with IF Conditions
XRSF also allows you to define condition-based input based on fields in your Salesforce architecture or on attributes from your invoice using IF conditions. These allow us to formulate a condition and, based on the evaluation of the condition, define different values that are written to the respective attribute field. The syntax for IF conditions is as follows:
IF( "Condition Field" 'operator' "Condition Value'', "Value if true", "Value if false")
The content in parentheses refers to the following:
1. Condition: This is where the condition to be evaluated is specified. A merge field/merge attribute is mandatory here, as the condition must evaluate a value from your Salesforce organization or from an attribute of the standard. This is followed by the operator and the condition value. XRSF supports the following options for the operator:
- == (true if the values are equal)
- != (true if the values are not equal)
- <, > (true if the value is less than/greater than)
- <=, >= (true if the value is less than or equal to/greater than or equal to)
Note: Microsoft Word uses "=" instead of "==" for checking equality
You can use these operators to compare numerical values as well as dates and times. Additionally, for textual comparisons, the following operators are available:
- contains (true if the field contains the condition text)
- not contains (true if the field does not contain the condition text)
2. Value if true: Here you define the value that is used if the condition evaluates to true. Merge fields/merge attributes are also possible here.
3. Value if false: Here you define the value that is used if the condition evaluates to false. Also here Merge fields/merge attributes are possible.
These three parts must be defined in the parentheses of the IF condition, separated by commas.
Example:
In Salesforce: IF( {!Account.CustomerPriority__c} == "High", "High Value Account", "Normal Account")
In Microsoft Word: { IF { MERGEFIELD Account.CustomerPriority__c \* MERGEFORMAT } = "High" "High Value" "Normal Account" }
This IF condition dynamically determines whether an account should be considered a high-value account or a normal account based on its “Customer Priority” field. If the field is set to “High,” it is considered a high-value account. In the following example, we have added this IF condition to our account list:
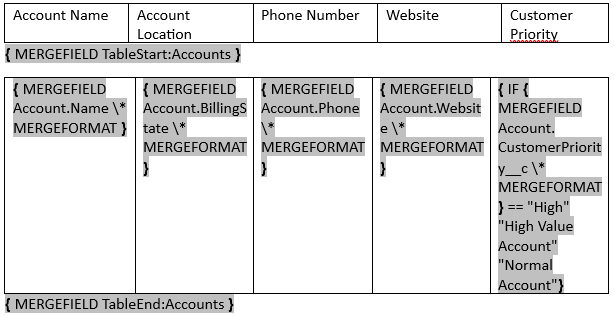 X
X
In the document created by XRSF, the table then looks like this:
 X
X
Note: The 'value if true' and 'value if false' fields can themselves contain IF conditions, too. However, we recommend to always keep such nested structures as simple as possible.
3.3. Mappings
To process incoming invoices and create or update Salesforce records based on their contents, you’ll use the Mappings section. Mappings are used to determine which values are to be mapped to which fields under which conditions. Mappings are similar in structure to Templates in that they also rely on scopes and configurations. However, instead of generating documents, they apply data from uploaded documents back into Salesforce records.
You can create a mapping by clicking on the ‘New’ button in the top right corner of the ‘Mappings’ tab.
In a new mapping, there are a couple of configurations you can make, and we will go through them one by one.
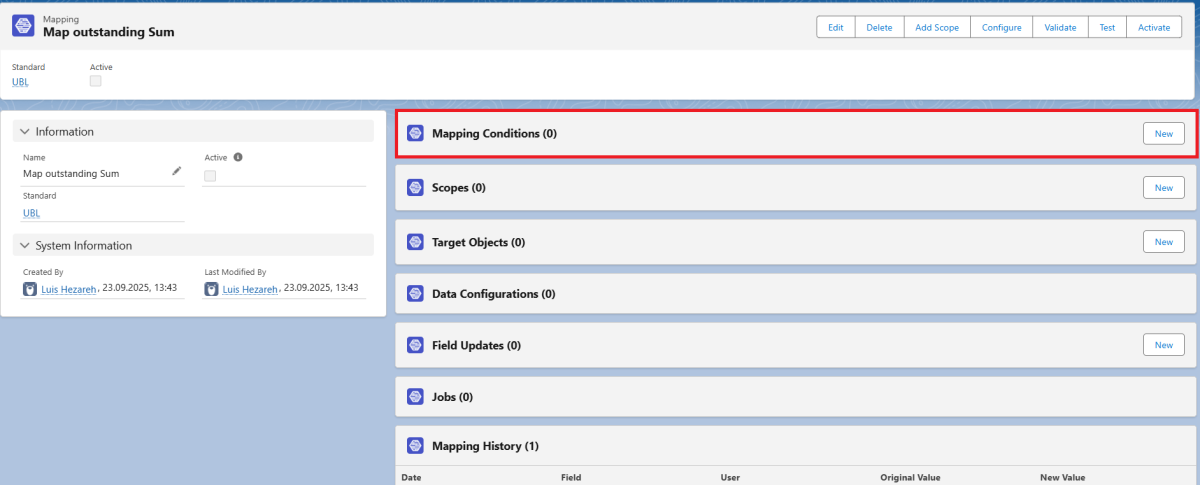
3.3.1. Mapping Conditions
In the mapping conditions, you can define conditions that must be satisfied for a mapping to be executed. A mapping condition can be either based on the file itself or based on Salesforce data (Object). You can create a new mapping condition by clicking 'New' in the mapping conditions section.
 X
X
Note: When creating multiple mapping conditions, watch out when using multiple conditions based on the same field. In theory, it is possible to create conditions such that the mapping will never be executed.
3.3.2. Target Objects
Target Objects können zusätzlich zu den Scopes angelegt werden. Diese sind speziell für die Verarbeitung eingehender Rechnungen konzipiert und dienen dazu, spezifische Aktionen auf Salesforce-Objekten durchzuführen. Um ein neues Target Object zu erstellen, klicke auf 'New' im Bereich "Target Objects".
Nun öffnet sich eine Oberfläche zur Erstellung eines Target Objects. Hier kannst du Namen des Target Objects, den API-Namen des gewünschten Objekts, und das zugehörige Mapping angeben. Außerdem kannst du wählen, welche Operation für dieses Objekt ausgeführt werden soll. Dafür gibt es vier Möglichkeiten:
- Insert: Hierbei werden neue Datensätze erstellt.
- Read: Die Daten werden lediglich gelesen, es werden aber keine Änderungen an Datensätzen vorgenommen.
- Update: Hierbei werden bestehende Datensätze aktualisiert.
- Upsert: Hierbei werden neue Datensätze eingefügt oder bestehende aktualisiert, falls ein passender Datensatz bereits existiert.
Hast du diese Felder ausgefüllt, klicke auf 'Save' und dein Target Object ist erstellt. Wie auch bei den Scopes kannst du die Operation, welche auf diesem Target Object ausgeführt werden soll, in den Data Configurations definieren.
3.3.3. Data Configurations
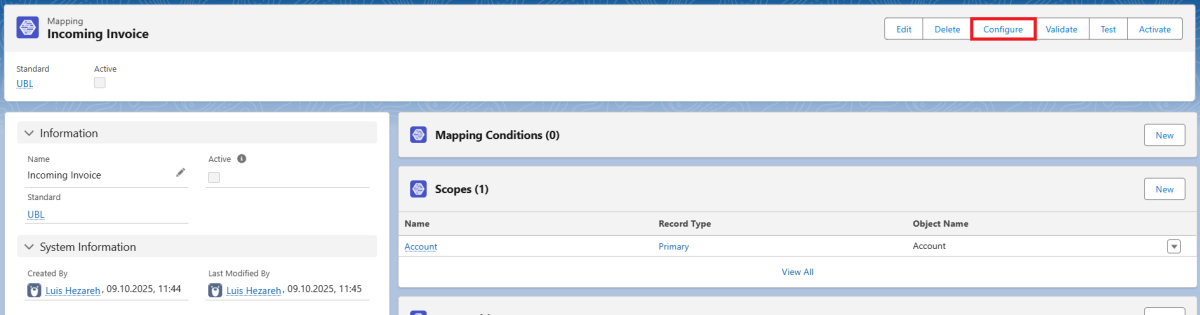
As with templates, you can define operations in the data configurations. However, attributes from an invoice are mapped to your Salesforce organization here. To make configurations, click on ‘Configure’ in the mapping record.
 X
X
A page will now open where you can define the configurations.
 X
X
Here, under "Target", select the target object to which the values of the invoice are to be transferred. Under "Attributes", you have access to all attributes that have been defined in the standard.
By clicking on the "Add" button, you can add the configuration and, in the next step, select the field in which the respective attribute is to be displayed under "Field". Here, too, the "Map multiple values" checkbox allows you to process arrays or comma-separated values. If an attribute contains multiple values, you can use the checkbox to control how these values are written to Salesforce (e.g. all values comma-separated in a text field or in a multiple selection list).
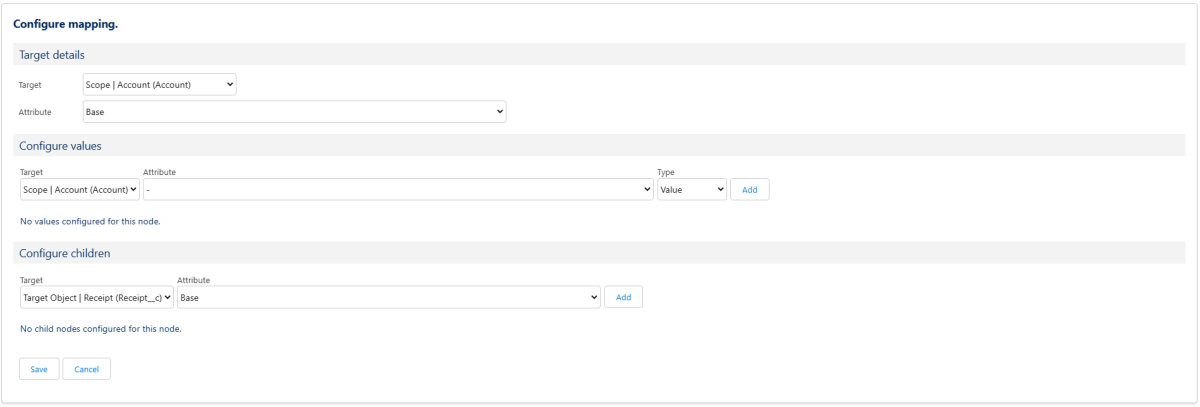
In the "Configure Children" section, you can create records related to a parent object. Set your previously created target object as the "Target" and click "Add".
 X
X
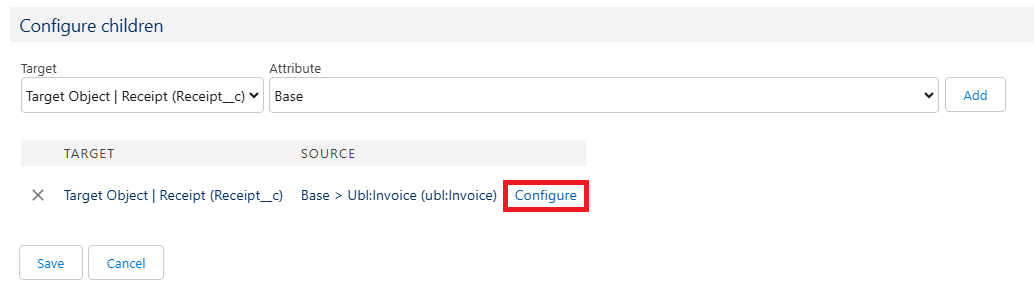
In this example, we have defined a target object "Receipt" prior to the configuration. In our case, a Receipt should be created for every invoice processed by this mapping. Now you can click on "Configure" and go one level deeper in the configuration. Here, the configuration works exactly as it does at the parent object level. For Values, you can choose an attribute to be assigned to a value in Salesforce, or define static input or choose a variable from a picklist by leaving the 'Attribute' field empty.
For the time-based variables (Current Time, TimeStamp), you can additionally add a time offset in the empty field next to the variable field. This time offset is calculated in minutes, for example a '+60' entry in the empty field adds 60 minutes to the time-based variable, while a '-60' entry subtracts 60 minutes.
With the "Superordinate Id" variable, you have access to the ID field of all parent objects. This makes it possible to access objects that are several levels above your position. The numbering refers to your current position (#1=one position above you, #2=two positions above you).
 X
X
In the following example, we have filled the values “Billing Postal Code,” “Billing Street,” and “Total Amount” with attributes, and also written the ID of the associated account to the lookup field ‘Creditor’ using the variable “Superordinate ID.”
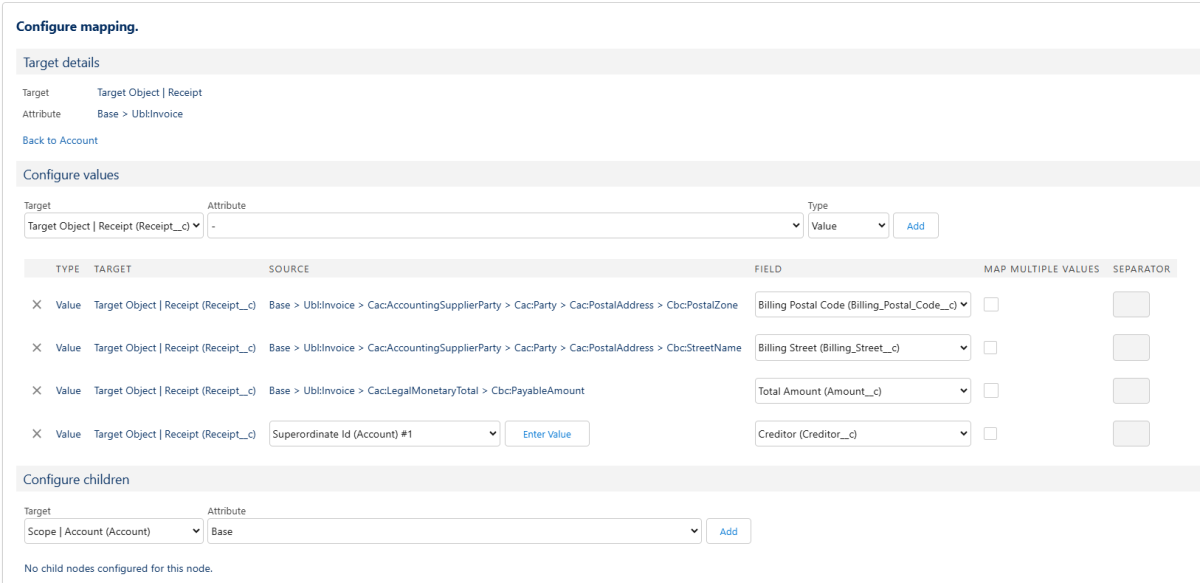 X
X
The "Back to Parent Object" button takes you back to the higher level. Once you have completed all configurations, click “Save”. All changes will be saved, and you will be returned to the mapping record.
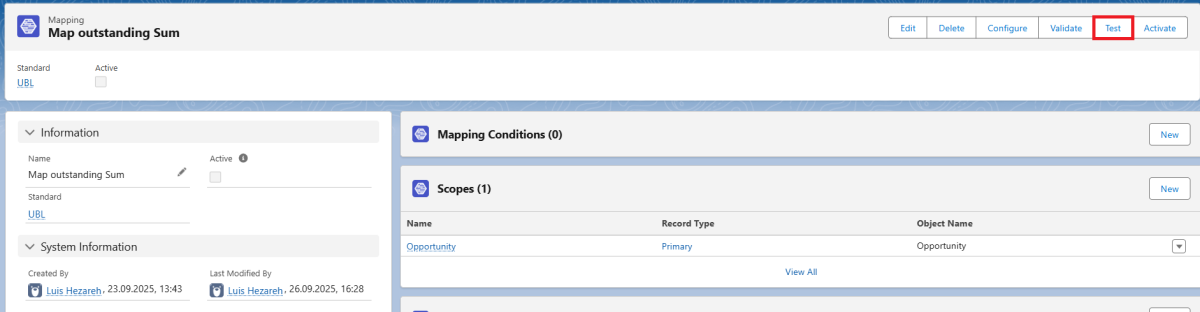
3.3.4. Testing a Mapping
Once the mapping has been configured, XRSF offers the option to test the mapping before activation without making any actual changes to your Salesforce organization. To test a mapping, click on the ‘Test’ button in the mapping record.
 X
X
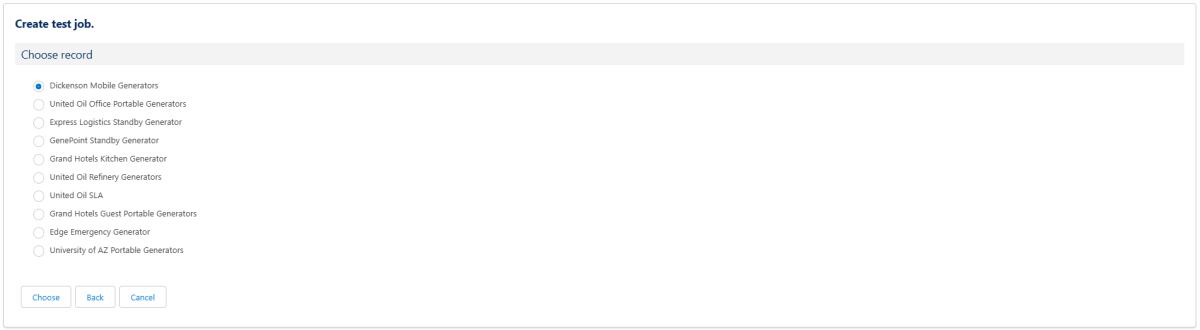
After clicking, a window will open in which you must now select a record for the test. Of course, you can only select a record that corresponds to your primary scope. Simply enter the name of the record in the search field, or leave the search field blank to see all available records.
 X
X
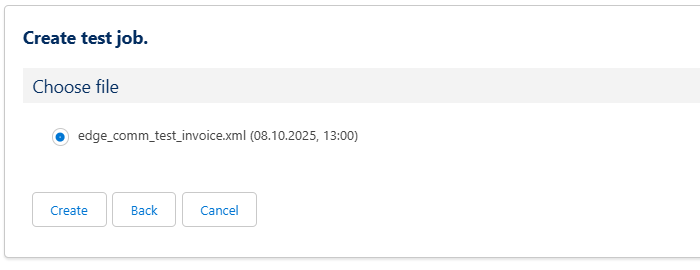
Select a record from the list, click ‘Choose’, and then select the file you want to use for the test in the next step.
 X
X
When you click ‘Create’, a job is created to simulate the process and show what would happen based on your current mapping configuration. As mentioned before, no changes are made at this point.
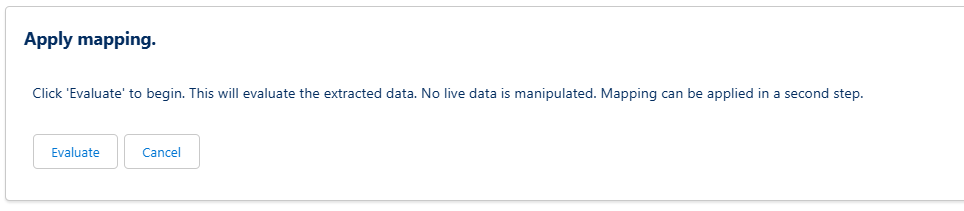
If you want to actually execute the mapping as part of the test and make changes in Salesforce, click ‘Apply’ to open an evaluation screen and then click ‘Evaluate’ in that screen. This will execute the mapping logic as in a live scenario and make changes in Salesforce. By clicking ‘Visualize’, you can also see the XML body of your created invoice.
 X
X
 X
X
If everything works as you expect, you can now activate the mapping by clicking ‘Activate’ in the mappings record. Once a mapping is activated, it will be executed automatically when a document is uploaded to a record of the Primary Scope type and all mapping conditions are met.
3.4. Automatic Invoice Generation
Once you have completed all the configurations, it is now time to create and process invoices.
For incoming invoices, the processing procedure is straightforward: simply upload your invoice to an object in Salesforce, and all active mappings that have defined this object as the primary scope will be triggered automatically.
To create invoices, you now need to define when and from where an invoice should be created using a template. Templates are not executed automatically, but can only be executed by a trigger. There are various options for this trigger.
- All templates can be triggered via Apex code
- All templates are Apex invocables and can be triggered by Salesforce Flows. The type of flow (record-triggered, autolaunched, screen flow) can be freely selected; all can be used for invoice creation. Click on “Add Element” in a flow and search for XRSF to add an XRSF document element.
In the following example, we have defined a screen flow that is triggered by a button on an object in our primary scope. Our flow is structured as follows:
- Screen Flow Start Element
- Assignment Element, which writes the triggering record's Id (defined by clicking the button) to a Collection Variable "parentIds"
- XRSF Document Flow Element, in which two variables are specified:
- the collection variable holding all record ids of the records wanting to create an invoice
- Template ID of the template to be used for creating the invoices
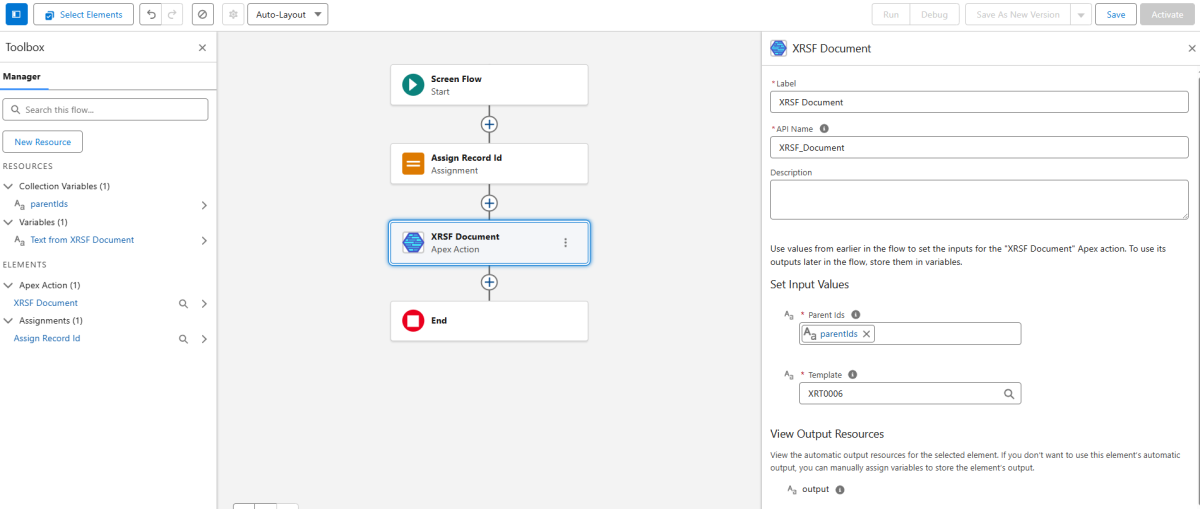 X
X
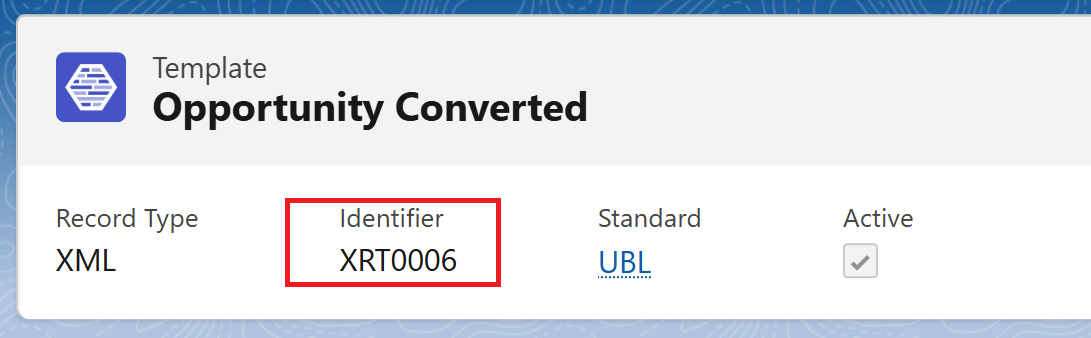
The template ID always follows this pattern: XRT-{0000}. You can find it in the template record in both the top bar and the “Information” section. The template must, of course, be activated in order to be executed.
 X
X
4. Validation and Error Handling
4.1. Validation using KOSIT
XRSF includes automated detection of supported document types. When a known document type is identified (e.g., ZUGFeRD or XRechnung), the file is validated using KOSIT standards.
What is KOSIT?
KOSIT (Koordinierungsstelle für IT-Standards, or Coordination Office for IT Standards) is a German government body responsible for developing and maintaining national IT standards for public sector interoperability. In the context of e-invoicing, KOSIT publishes and maintains the official specification for XRechnung, which is Germany’s CIUS (Core Invoice Usage Specification) implementation of the European e-invoicing standard EN 16931. XRechnung is mandatory for sending invoices to public authorities in Germany.
KOSIT also provides the complete validation framework to ensure technical and semantic correctness of such invoices. This includes:
- XML schemas (XSDs) to validate the structure of invoices (either in UBL or UN/CEFACT syntax)
- Schematron rule files to enforce business rules and semantic validations, including both European and Germany-specific requirements
- A versioned XRechnung configuration bundle and open-source validation tool used by many software vendors and government portals
The official validator can be used via command line, embedded Java API, or as a local HTTP service. It produces structured validation reports in XML and HTML formats, including error paths and descriptive messages for any detected issues.
The app handles validation differently depending on whether the document type is recognized.
Recognized document type:
If the uploaded file is a supported and recognized type (e.g., a valid XRechnung XML with UBL or CII syntax), it is automatically validated using the official KOSIT validation engine, which runs:
- Schema validation (XSD)
- Business rule validation (Schematron)
- Syntax detection and appropriate scenario selection
If validation passes, the document is saved with the status validated.
If validation fails, the document is not saved, and the user receives a detailed validation report indicating all errors, including the exact XML path and violated rule.
Unrecognized or unsupported document type:
If no known type is detected, validation is skipped. The document is still saved (without a validation status and without any errors) allowing the system to handle additional or custom formats (e.g., PDF invoices, custom XML). This ensures flexibility for future expansion.
Note: Support for formats beyond ZUGFeRD/XRechnung is planned as soon as official validation frameworks for them are published.
Technical note for integrators:
The application uses KOSIT’s official reference validator, configured with the most recent XRechnung validation scenario. The validator runs locally in CLI mode and generates both machine-readable XML reports and human-readable HTML output, which are stored for audit and support purposes. Validation outcomes are classified by severity (error, warning, etc.), and the integration maps those into appropriate application-level behavior (e.g., blocking save vs. allowing upload with notice).
Note: If a mapping is not validated correctly, the process does not stop automatically. It continues running despite the failed validation. On the other hand, templates are always validated.
4.2. Error Handling
4.2.1. Data entry error
In case of errors due to incorrect entries or connection problems, the user will receive a corresponding message.
If no error message is displayed, it can generally be assumed that the action triggered was successful.
Displayed error messages may originate from partially connected third-party systems, the XRSF application or Salesforce itself.
If an error message is unclear, we recommend consulting the Salesforce administrator responsible for the installation. If they are also unable to help, simply contact us by email at support@xrsf.app and send us a screenshot of the error message so that we can help you directly.
4.2.2. Error with actions executed in the background
For a better overview, a large part of the actions carried out in the background are stored in a ‘Result’ object set up for this purpose. This makes it possible to track actions carried out in the background or automatically.
A list of these result data sets can be found in the ‘Results’ tab. If successful, the message ‘Success’ is displayed. If there is an error, the corresponding error is displayed.
Every time a Template is used to generate a document or a Mapping is applied to an uploaded file, a Job record is created. The Job provides a summary of the action taken, which record triggered it, and a log of any updates performed.
Each Job may contain one or more Results, depending on how many records were processed. A Result includes a detailed message showing whether the operation succeeded or failed, along with additional context.
When an error happens while executing a template, an email is sent to the administrator who configured and installed XRSF, but in the case of mappings, as the problem could be related to a misconfiguration or error in the incoming file, no email is sent out to the admin.
Note on freeing up storage space: To free up storage space that has been used up over time by accumulated ‘Result’ data records, the ‘Clear’ button can be used in any list view of the ‘Results’ tab. Please note that when using this button, all ‘Result’ data records are always deleted regardless of the list view currently displayed!
4.2.3. Errors from the KOSIT Validation
If the validation of the KOSIT validator fails, the following error message is displayed:
Validation error. Assessment: It is recommended that the document be rejected.
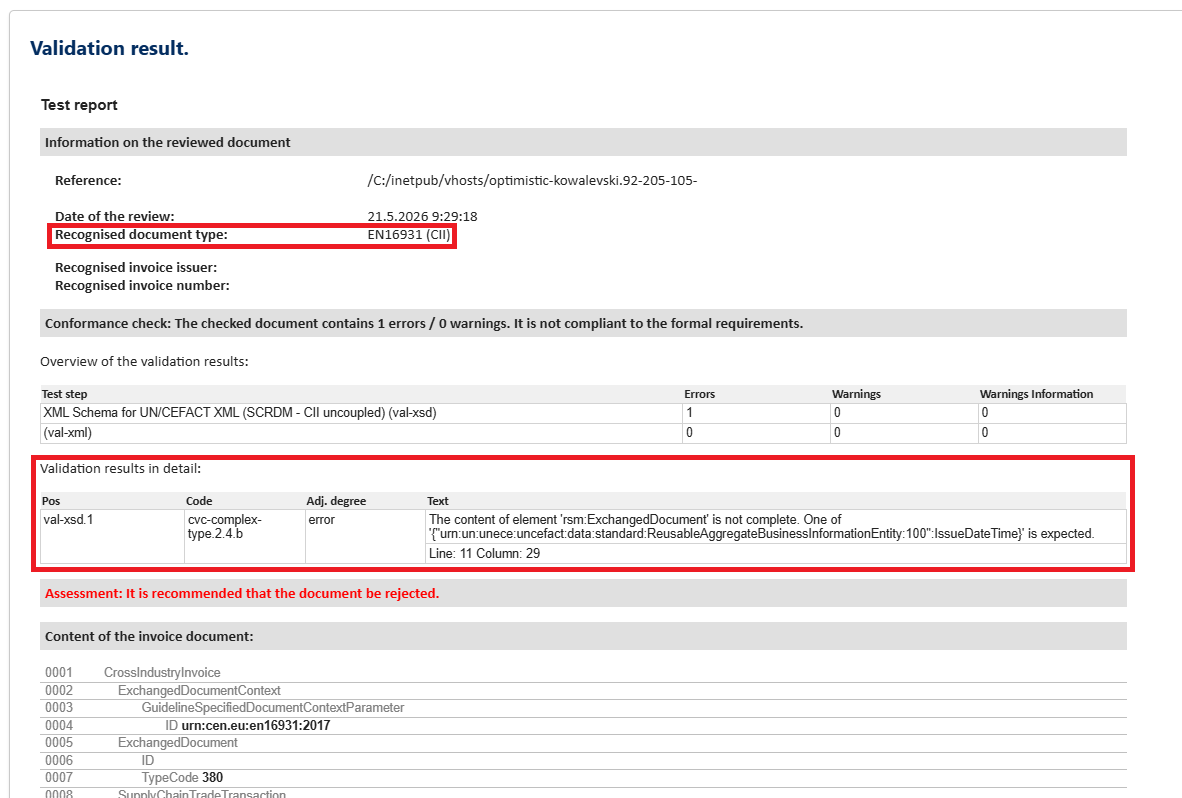
For a detailed description of the errors, click the “Validation Result” button at the job level. This will open an overview of the KOSIT report, in which all error messages are listed in a structured format.
In the following example, you can see the KOSIT validator’s report for a failed invoice. In this case, the validator automatically recognised an invoice schema (Recognised document type), and the ‘IssueDateTime’ element, which is mandatory for this schema, was missing from the invoice. The invoice would not have been valid without this field, which is why the invoicing process was interrupted.
 X
X
5. Glossary
Objects
Objects are data structures within the Salesforce database. Examples of standard objects that come pre-configured in Salesforce include Accounts, Contacts, and Opportunities. In addition to these standard objects, any number of custom objects can be configured within Salesforce to meet specific business requirements.
App Launcher
The App Launcher in a Salesforce org allows users to switch between different applications. It displays tiles linked to available Salesforce apps, connected third-party apps, and the user's local applications.
XRSF Licenses
XRSF licenses are required solely for configuration purposes. They do not need to be assigned for the automation of data extraction.
Permission Sets
Permission sets are collections of permissions that extend a user’s access beyond what is defined by their profile.
Formula Field
A formula field is a read-only field whose value is calculated based on a defined formula. It cannot be edited manually.